Thursday, April 23, 2009

Lemon and Lime Marmalade

Having your wisdom teeth pulled out is not fun. Despite what blogger #800 says about having his taken out at 9am and eating steak at 6pm. He must have been either terribly drugged up or was already on crack to begin with. And when you're at my age when your bones are as dense as your brain, the healing process takes about three times longer.

I had mine taken out last Friday and am still suffering the after effects of vicodin overdose, a throbbing sensation in my left ear and the distinct smell of gums. I looked like John McCain for the better half of the week, but the nut-filled cheeks have slowly dwindled away and all I'm left with now is teeth socket that has been soaked to the core with homemade chicken broth. I never thought I would say this but I'm actually quite sick of ice cream. What has this world come to!

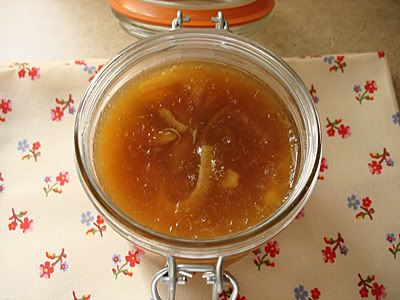
Anyway, on to happier things, while drugged up on a cocktail of painkillers, I managed to potter around long enough without burning down the kitchen to whip up some lemon and lime marmalade, something that's entirely British but is a very good way to get rid of an overstock of lemon and limes that we bought in bulk from Costco in a fit of madness. This marmalade is a staple in British pantries (along with Marmite!) and puts a little zing in your morning muffins with a dab of butter. I made it less sweet because I like the bitter/sourish taste but you can up the sugar amount from 1 lb to 1.5 lb.

Lemon and Lime Marmalade
Adapted from Delia Smith

Makes 4 12oz jars

3 lemons
3 limes
1 lb granulated sugar
3 cups water
1 piece muslin/cheesecloth about 6in x 6in.

Measure 3 cups of water into a preserving pan or heavy-bottomed saucepan. Turn on the heat to low.

Meanwhile, set up the muslin cloth over a small bowl. Squeeze the juice from the lemons and lime into a medium bowl. Set aside the pith, seeds and pip on the muslin cloth. Cut the lemon and lime peel into thin strips. Don't worry about any of the pith that clings to the peel, it will get dissolved and turn into pectin.

Pour the juice into the water and bring to a simmer. Add in the shredded lemon and lime peel. Tie up the muslin cloth containing the pith, pips and seeds and hang it to the side of the saucepan so that it is suspended in the water.

Simmer the mixture, covered for about 1.5 hours until the peels are soft. At this point, wash your jars with warm soapy water, dry and pop into the oven at 225°F. Pour the sugar onto a baking sheet and pop this into the oven as well. Also, put two saucers into the freezer to be used for testing later.

Once the sugar is melted, pour it into the jelly mixture and stir lightly to ensure all the granules are dissolved. Once the granules are dissolved, bring the entire mixture up to boil. Once it starts boiling rapidly, time yourself. Let it boil for 15 minutes and spoon a little of the jelly onto one of the saucers from the freezer. If the jam has set, it will be stiff and not runny on the cold saucer. If it is runny, time yourself for another 10 minutes, and do the same test.

Once the jelly mixture is set, remove the saucepan from heat and set aside to cool slightly for 20 minutes. This is important so that the jelly has time to set.

Spoon the cooled into the sterilized jars.

P/S: I don't do canning, once the marmalade has cooled in the jars, I just pop them in the fridge. It will last for at least a month.

Monday, April 13, 2009

Orange and Almond Tart

As promised, here is the orange and almond tart from yesterday's Easter lunch. I'm much too tired today to go into all the details of concocting this, so I will leave you with words of wisdom: This is the easiest tart you will ever make. 'Nuff said.

P/S: And it tastes like exploding blobs of citrus too! And it can be made dairy-free! And no crazy pastry-making!

(I couldn't resist the temptation, sorry for the missing slice!)

Orange and Almond Tart

Adapted from The Organic Seasonal Cookbook
Makes 6 servings

1 store-bought frozen pie pastry shell

1 unwaxed organic orange
1 stick butter (Earth Balance or Saffola also works)
1 cup granulated sugar
2 eggs, beaten
1 cup ground almonds (or almond meal)

To make the filling, put the orange in a saucepan, cover with water then simmer for 40 minutes, covered, until completely soft. Let the softened orange cool slightly, then cut in half and remove the seeds. Put in a food processor and whiz to a puree. Add the butter, sugar, eggs and almonds and whiz again until smooth.

Unroll the pastry shell over a 8" tart tin. Anchor the edges of the pastry overhang to the side of the tart tin and prick with a fork all over. Pre-bake in oven at 425°F for 10 minutes.

Fill the pre-bake tart shell with the orange filling and bake at 350°F for 40 minutes until the filling is firm. Remove from the oven and let cool. Serve the tart in slices with good vanilla ice cream.

Sunday, April 12, 2009

Happy Easter!: Springtime Lamb Stew

I have a love-hate relationship with lamb. If it were up to me, and genetics did not make my metabolic rate so terribly flawed, I would have lamb everyday of the week. Lamb chops, lamb patties, lamb shanks, lamb pies, lamb curry and of course lamb stew of all sorts. Before you associate eating lamb with the killing of babies and all things cute, if you have ever tasted a pan-seared lamb loin chop while on vacation in Southern France, you will know that eating a tiny spring lamb is akin to sipping the finest wine in a field of golden tulips at sunset. Well, ok, I was trying to be poetic, but you catch the drift.

This is a Provencal recipe I nicked off a book I found in Borders for less than $5. It's called 'Savoring Provence' and has a fantastic selection of French recipes, every which one I will try at some point. The recipe calls for shelled English peas, but since young tender sugar snap peas are in season, I substituted that instead. The recipe also calls for bouquet garni (pic above) which is just a fancy French name for a herb bouquet made up of fresh parsley, fresh thyme and one bay leaf (fresh or dried is fine) tied together with a piece of butcher string.

Unlike traditional winter stew, this recipe doesn't incorporate potatoes, but is served on the side with boiled potatoes (pic below) tossed with butter, salt, pepper and freshly chopped parsley. For dessert, I made an orange and almond tart that rounds off the whole spring theme really well. But I'm not going to just hand you the recipe, you'll have to work for it by coming back and clicking on this blog and humor my shameless self-promotion.

Oh, and find a good bottle of Cotes du Rhone or Bordeaux blanc. This is one of the few times you will want to pair a meaty dish with white wine.

Springtime Lamb Stew (Navarin d'Agneau)
Makes 6 servings
Adapted from 'Savoring Provence'

1/4 cup unsalted butter
1 boneless leg of lamb (about 2lbs), cut into 2-inch cubes
1 large yellow onion
1 tbsp all-purpose flour
2 cups dry white wine
2 cups low-sodium chicke broth
Bouquet Garni (3 parsley stalks, 2 thyme stalks, 1 bay leave)
4 cloves garlic, minced
2 teaspoons sugar
Salt and freshly ground black pepper
1 lbs young Nantes carrots, cut into 2 inch lengths and halved
4 baby turnips, quartered
1 bunch small radishes, trimmed
1/2 lb (about 6) shallots, peeled and quartered
1/2 lb sugar snap peas
24 asparagus tips, about 3 inches long
2 tbsp chopped fresh flat-leaf parsley (for garnish)

In a large dutch oven, melt the butter over medium heat. Working in batches, add the meat and brown well on all sides, about 15 minutes for each batch. When all the meat is browned, return it to the pan, add the onion and saute until translucent, about 1 minute. Scatter the flour all over and cook, stirring, until some of the flour browns, about 30 seconds.

Add the wine, the chicken broth and the bouquet garni and bring to a boil. Reduce the heat to low and simmer, uncovered for 15 minutes. stir the meat, add the garlic, sugar and season lightly with salt and pepper. Cover and continue to simmer over low heat for 30 minutes. [Amanda's note: You can cool this part and refrigerate if you intend to use it the next day. Just reheat and do the following:]

Add the carrots, turnips, radishes, shallots and cover and cook at a gentle simmer until the meat is tender, about 40 minutes. Add the peas and asparagus about 6 - 8 minutes before the end of cooking time.

Remove the bouquet garni. Using a slotted spoon, transfer the meat and vegetables to a warmed serving dish and keep warm. Raise the heat to high, bring the liquid in the pot to a boil and boil rapidly, stirring constantly until reduced to a light sauce consistency. Taste and adjust the seasoning with salt and pepper.

Spoon the sauce over the meat and vegetables. Garnish with the parsley and serve.

Tuesday, April 7, 2009

Cheesy Moving Blues: Spaghetti with Chards, Prosciutto and Roquefort Cheese

The lack of recent updates can be attributed to the activity of moving into a new place - a somewhat tedious chore that has taken well over two weeks and have driven both me and the boyfriend nuts. We've moved out to the edge of the city, not quite the burbs, but on the edge no less where a lawn mower wakes us up on Saturdays and the bus drops off a bunchload of yelling kids down the road, much to the chagrin of my dog who goes off at the slightest sound.

The one good thing about moving farther away from the center of downtown though is that rent is a tiny bit cheaper and I can now afford a CSA box. The box we get from New Roots Organics is massive even though we only signed up for a personal bin meant for a one person household. This week we got a whole bunch of chards, carrots, lettuce and mustard greens and a few asparagus spears, apples, oranges, pears, red peppers and zucchinis.

The other good thing about living farther away from everything that matters is that we make "stock-up" trips so that we don't have to go to the grocery store every now and then. Enter Costco. I've always found their cheese and wine selection to be top-notch. But over the weekend, I must have had dry-heaves about 18 times looking at a 12oz wedge of Papillon Black Label Roquefort that was selling for $13.99. That's right, $13.99. It can cost almost three times the price at a gourmet cheese store, and is one of the reasons I hardly ever eat Roquefort except when we're at a fancy French restaurant.

The combination of chards from my CSA box and finding the Roquefort for cheap leads me to perhaps what is one of my all-time favourite ways to make pasta. You have to ensure that you use really good quality ingredients so that all the flavours meld together to create a wonderfully savoury dish. Everything from the pasta to the cheese down to the lemons you use have to be the best you can afford, otherwise you might just dismiss this as a bland affair. If you can't find/afford Roquefort, a good grade Italian Gorgonzola would also work well. Enjoy with a light white wine such as Semillon or Riesling so that it doesn't overwhelm the flavour of the cheese.
Spaghetti with Chards, Prosciutto and Roquefort Cheese
Makes 2 servings

4 oz good quality whole wheat spaghetti
3 cloves garlic, minced
2 cups rainbow or swiss chards, chopped and stem removed
4 slices prosciutto, sliced in thin strips
1/2 cup good quality Roquefort, crumbled
1/4 teaspoon salt
Zest of 1/2 lemon
2 teaspoon toasted pine nuts, chopped
Salt and freshly ground black pepper

Cook the pasta in salted, boiling water until al dente. Reserve some of the pasta water.

Meanwhile, heat a saute pan with 2 tablespoons good quality olive oil. Add in the minced garlic and saute gently over medium-low heat for 1 minute until it starts to turn slightly golden. Add in the chards and 1/4 teaspoon salt and saute for another 3 minutes until the chards are wilted. Turn off the heat.

Stir in the grated lemon zest, sliced prosciutto and roquefort cheese. Add in the cooked pasta and toss to combine. The residual heat from the chards will melt the roquefort slightly. If the pasta seems to dry, you can add in a little bit of the reserved pasta water.

Add in the freshly ground black pepper to taste and serve the pasta topped with a slight scatter of toasted pine nuts.

Sunday, March 22, 2009

Italian Sausage Ragu

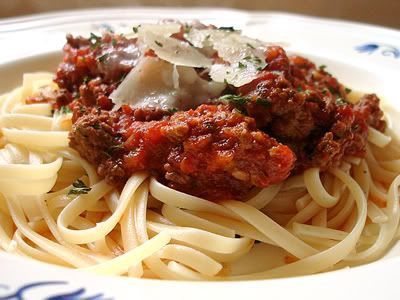
Pasta is one of my favourite dishes in the world, there is no comfort food better than a gigantic bowl of good quality handmade pasta with some old-fashioned meat sauce. Serve that with a piece of crunchy garlic bread and a good bottle of Chianti, and that's the most perfect dinner you will ever have.


Every Italian cook has their own special ragu i.e. meat sauce. Chances are, you will never find the one "authentic" Italian ragu. Some people like it without garlic, some without celery, some add milk, others don't, etc. etc. Well, as someone who has experimented a lot with creating the perfect ragu, I can tell you that the basics are always to start off with a soffrito (onion, celery and carrot mix), use good tomatoes (peeled and seeded) and keep herbs to a minimum. The only time you really want to use lots of fresh herbs is when you're preparing a simple tomato dish, otherwise, you should let the meat do the flavouring.

This recipe is a Konosur concoction, and combines both spicy Italian sausage with ground beef to create a rich and deeply satisfying ragu. I omitted milk from this recipe because of the usual dairy-free fiasco, but I think you will find that it works just fine. Remember to serve this with flat noodles, fresh ones if you can. Just a thin shaving of real Parmigiano would suffice for this. I promise you, you will think twice before buying that bottle of sauce from the grocery aisle.

Italian Sausage Ragu
Makes 6 servings

2 spicy Italian sausage links(you can also use mild), quartered with casings
1 lb lean ground beef (we used < 9% fat)
1 large yellow onion
1 medium carrot
2 ribs celery
1 small red pepper
4 cloves garlic, minced
2 tbsp double concentrated tomato paste or 4 tbsp tomato paste
3 14.5oz cans ground and peeled organic tomatoes
1/4 cup good dry red wine
2 tsp sweet basil
1/2 tsp grated nutmeg
Salt and freshly ground black pepper
2 tbsp olive oil

Prepare the soffrito by chopping the onions, carrots, celery and red pepper together. I used a food processor and roughly pulsed everything.

Heat the olive oil on medium-high heat in a large pot or dutch oven. Saute the soffrito for about 5 -7 minutes until the onions are translucent. Add in the minced garlic, meat and sausage. Saute for another 10 minutes until the meat is browned and fragrant.

Add in the tomato paste and stir to combine. Saute for a couple more minutes until the tomato paste has blended in to the meat mixture. Add in the tomatoes, wine, basil and nutmeg, turn the heat down and cover. Simmer for at least 3 hours (4 if you have time), stirring from time to time. If the sauce becomes too thick, you can add in a little beef broth at a time - but this probably just means you've kept the heat on too high.

After 3 hours, season with salt and pepper to taste. The meat sauce should be thick. Stir through and turn the heat off. Serve with tagliatte and grated parmesan and chopped parsley on top. Remember not to oversaturated the noodles with the sauce since the sauce is very thick and a little goes a long way.

Note: To store, cool the sauce completely and freeze in airtight glass containers or double Ziploc bags. They freeze well for at least 3 weeks.

Saturday, March 21, 2009

Gastronomic Salad with Homemade Garlic Croutons


I don't know about you, but there are some days I just feel "icky". Sort of in the way when you've waddled out of a fast food joint and you smell sickeningly like grease. Or when you've been too greedy at a diner buffet. Or when you've been eating nothing but Twinkies and potato chips for three days. That sort of icky.


So when you're feeling icky, there's nothing better than to keep things light with lots of vegetables and fruits. I like to combine both in a salad with a light dressing - nothing creamy or thick, just a garlicky dressing with olive oil and wine. To make it more satisfying for dinner, I usually add my own homemade croutons (less oil/butter than store bought ones) and some form of meat.

La Panzanella (it's a Seattle institution and the bread and crackers are beyond superb) at the Farmers' Market had a really splendid loaf of focaccia today and I thought it would be good to make some garlic croutons and toss it with one of my favourite Konosur concoctions. The recipe combines spring greens (butterhead lettuce and a herb salad mix), prosciutto and blood oranges to make it a seasonal salad that help rids the "ickyness" of having eaten badly for the past week. It makes a satisfying dinner and is complemented well with a glass of 2007 Sauvignon Blanc from California (Try 2007 Vintage Bogle for a good, cheap Sauvignon Blanc under $10).

Gastronomic Salad with Homemade Garlic Croutons
Serves 4

1/2 loaf foccacia bread, cut into 1/2 inch cubes
4 tbsp extra virgin olive oil
2 cloves garlic
Salt and pepper
2 tbsp orange juice
2 tbsp white wine
2 cups butterhead lettuce, torn
1 cup herb salad mix (combination of arugula, dill, tarragon, parsley and endive)
1 large blood orange, peel removed and sliced
3 slices prosciutto, sliced into strips
2 tsp fresh rosemary, roughly chopped
1/4 cup sweetened, dried cranberries
2 tbsp roughly chopped pistachios

Preheat oven to 325°F.

To make croutons, combine cubed bread, two tablespoons olive oil, rosemary and 3/4 of the minced garlic in a large bowl. Season with a little salt and pepper. Toss well to mix all the ingredients together. Spread out on a baking sheet lined with foil. Toast in the preheated oven for 10 minutes, stir with a spatula and toast for another 10 minutes until croutons are crunchy and golden brown. Set aside to cool.

Meanwhile, make the dressing by combining the remaining 2 tbsp of olive oil, remaining mince garlic, orange juice, white wine and dash of pepper in a small bowl. Whisk and set aside.

Assemble the salad: On a large platter, arrange the salad leaves, sliced orange and sliced prosciutto. Scatter the cranberries and pistachios over the top. Drizzle with the dressing. Toss everything together and serve with croutons on top.

Sunday, March 15, 2009

Homemade Low-fat Tropical Fruit Granola

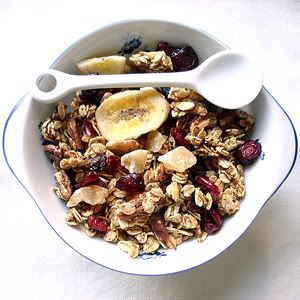
There's something always satisfying about waking up in the mornings and knowing that breakfast is there waiting for you. I think that's the reason we all resort to boxed cereal. My usual quick breakfast usually consists of a bowl of homemade granola with skim milk, half a banana and two tablespoons of yogurt. And of course the default mega-size cup of black coffee.

Part of my early diet strategy from a few years ago involved store-bought granola, which if you're not careful in choosing, can contain tons of saturated fat and sugar. The reason why factory-made toasted oats taste so good is because it's slathered with lots and lots of honey, maple syrup and sugar! Add that with plump, juicy, sugar-cured fruits and you've got a candy factory masquerading as health food. Some companies substitute the maple syrup/honey with manufactured sweeteners in order to lower the calories, something which I think takes away from the wonderful flavor of real granola.

The truth is that granola isn't the best kind of breakfast food for you. You'd be better off with cooked oats, a dash of cinnamon, a teaspoon of honey and some sugar free dried fruit. But in moderation, granola can be a nice crunchy topping to some yogurt or cottage cheese, which will be high enough in protein and should keep you feeling jaunty for the rest of the morning.

The secret to good granola is to toast the oats over low heat in the oven until they turn a beautiful brown color. I use applesauce to substitute the oil and to sweeten the granola. Then I toss the toasted oats with some unsulphured dried fruit mix - you can use unsweetened fruit, but because I use less sugar/sweetener than most recipes call for, I think it's perfectly fine to use sweetened fruit.

Homemade Low-Fat Tropical Granola
Makes 12 servings of 1/4 cup

Granola Mix
3 1/2 cups old-fashioned oats
3 tbsp ground flax seed
1/2 cup chopped pecans (you can also use almonds or walnuts)
1/4 cup maple syrup
1 tbsp brown sugar
1/4 cup unsweetened apple sauce
1 tbsp vegetable oil (I used Smart Balance 3-oil blend)
1 tsp cinnamon
1 tsp vanilla extract
1/2 tsp salt

Dried Tropical Fruit Mix
1/2 cup unsulphured Tropical Fruit Mix: Pineapple, Mango Papaya, Banana chips (I buy them from the bulk aisle at Whole Foods or they are also available at Trader Joe's)
1/4 cup raisins
1/4 cup low sugar dried cranberries (I use Eden Organics)

Preheat the oven to 325°F. Line a large sheet pan with parchment paper. Set aside.

In a large bowl, mix together all the ingredients for the granola using two large spoons. To create clusters, use your hands to squeeze the mixture together.

Spread the granola mix onto the prepared sheet pan in one layer. Toast in the oven at 325°F for 25 minutes until the granola is crisp and brown. Remove from the oven and let cool in the pan.

Mix in the dried tropical fruits. Store in airtight jars for up to two weeks.

Friday, March 13, 2009

St. Paddy's Day calls for Some Cupcakes


For a long time now I've sworn not to be sucked into the cupcake blackhole that is swirling around on the food blogosphere. Cupcakes! What?! Those tiny little cake/muffin wannabes often decorated to look like sickly cottage drawings; so cute you want to throw them against a wall just to rid them of that sickly pastel hue used in a gazillion pounds of butter and cream and sugar.

Cupcakes! Sold in overpriced shops in the chicest of neighbourhoods, charged at $5 a pop for a malt-button, candy-cane, marzipan topping in the shape of effing "Hello Kitty" or god knows what species of hydrangea and posies. Those bloody cupcakes. I told you I swore not to be sucked in.


But I've come to the realization that cupcake resistance is futile. They're easy to make, come in bite-size amounts, AND you can slather tons of disasterous artery-clogging fat on it, and it will still turn out beautiful. That's the unfortunate and evil beauty of cupcakes.


I thought and thought for days about something to make for St.Patrick's day in order to satisfy my ever-burgeoning sweet-tooth. Somehow the idea of clover-patterned cookies just seem so cliched. Enter the liquer-infused cupcake. Alcohol? Check. Sugar? Check. Butter and cream? Check.


I've been trying for aeons to figure out how to get rid of the bottle of Irish Cream sitting in the back of the liquor cabinet for a long time now. I would drink it neat but it just seems like such a 1990s "mom" thing to do. So here, with my Irish cream buttercream, cream-filled face in hand, I present the beast that is my green-coloured Irish Cream Cupcakes for St. Patrick's Day. They're moist, smell slightly of coffee and topped off with silly little shamrock rosettes. Póg mo Thóin indeed!


P/S: As I write this, I promise you I am NOT drunkk.

Irish Cream Cupcakes
Makes 6 cupcakes (because hey, these can and should be illegal).

1 cup unbleached all purpose flour
1/2 tsp baking powder
1/2 tsp salt
4 tbsp butter, room temperature
1/2 cup granulated sugar
1 large egg, room temperature
1 tsp vanilla
1/8 cup brewed coffee, cooled
1/3 cup Irish Cream

Preheat oven to 350°F. Line a 6 cupcake tin with liners.

On a piece of wax or parchment paper, sieve together flour, baking powder and salt. Set aside.

In a large mixing bowl, cream the butter and sugar together until fluffy, about 2-3 minutes using a stand mixer or 5 minutes using a handheld mixer.

Add in eggs, vanilla, liqueur and coffee. Beat until just combined. Gently fold in the flour mixture and beat for about 1 minute until the mixture starts to form. DO NOT OVERBEAT. Turn off the mixer and use a rubber spatula to fold all the ingredients until completely combined.

Divide the batter into the prepared tin, filling the liners until about 2/3 full. DO NOT OVERFILL. Bake in preheated oven at 350°F for 15 - 20 minutes until tester inserted in the middle comes out clean. Turn the cupcakes out and cool completely on a wire rack. Top with buttercream frosting (recipe follows).

Irish Buttercream Frosting
2 tbsp butter, room temperature
1/4 cup and 2 tbsp powdered sugar
2 tbsp Irish cream
Green food coloring

Cream the butter, powdered sugar and Irish cream in a bowl for about 1 minute until fluffy. Add in a few drops of green food coloring and stir thoroughly. Spoon buttercream into pastry bag and use a 22 star tip to pipe little rosettes in the shape of a shamrock onto the cupcakes.

Sunday, March 8, 2009

Apple Spice Cake with Coconut Caramel Sauce


The boyfriend ages a year today. By the unspoken law of dating courtesy, I can't reveal his age, but let's just say it warrants a nice home-cooked dinner and a delicious cake to go with it. It's always hard when someone has allergies, and with dairy-allergies it's even worse, because store-bought cake is usually out of the question. More often than not, I have to settle with baking a coffee-cake instead.

This is my take on a classic spice cake which I have tried to turn into an apple spice cake with a fluffier and lighter texture than a coffee cake. The boyfriend's mum first shared with me a spice cake recipe which was called "Wacky Cake" just because it had really weird ingredients like vinegar. I have modified that to include chopped apples and nuts, topped with a coconut caramel sauce, and is best served with some creamy vanilla ice cream on the side. The one good thing about cakes that don't have goops and goops of cream on it is that it's usually quite good for you, and you can always have an extra helping without worrying about the calories.
By the way, I have to make a huge plug for Green and Black's Organic Vanilla Ice-Cream which, when served with the apple spice cake is the most delicious thing in the world. Of course, if you're going completely non-dairy, then you can serve it with soy ice cream, otherwise, Green and Black's Organic Vanilla Ice Cream will satiate your decadent fix.

Apple Spice Cake with Coconut Caramel Sauce
Makes one 8-inch cake

Dry ingredients
1 cup unbleached all purpose flour
1 tsp ground cinnamon
1/4 tsp allspice
1/4 tsp salt
1/4 tsp baking powder
1/4 tsp baking soda

Wet ingredients
1/4 cup vegetable oil
1/4 cup apple sauce
1 large egg
1/2 cup light brown sugar
1 tsp good quality vanilla essence
1 tsp French brandy

To fold
1 large apple (Fuji or Granny Smith, depending if you like it tart), peeled and chopped
2 tbsp chopped walnuts
2 tbsp chopped pecans

Preheat oven to 350°F. Butter and flour an 8-inch cake pan if you're using a traditional aluminum pan. If using a non-stick pan, do not grease.

Sieve all the dry ingredients onto a parchment paper.

In a large bowl, beat all the wet ingredients together on high speed until fluffy. Turn the mixer speed down to low. Lift the parchment paper with the dry ingredients and fold into half. Gently pour in the dry ingredients into the wet ones bit by bit. Beat gently until the ingredients come together. Turn off the mixer.

Fold in the apples, walnuts and pecans gently. Spoon the batter into the prepared cake pan. Bake at 350°F for 50 minutes until a thin knife inserted into the middle of the cake comes out clean.

Remove from the oven and let cool in the pan for 5 minutes. Then turn out onto a wire rack and let it cool completely. Serve with coconut caramel sauce (see below) and vanilla ice cream.

Coconut Caramel Sauce
Makes 6 servings

3 heaping tablespoons brown sugar
1 tbsp butter (or vegan cooking margarine)
2 tsp vanilla essence
1/4 tsp salt
1/4 cup light coconut milk

In a saucepan over very low heat, gently melt the butter and sugar. Once melted, add in the remaining ingredients and whisk until everything is combine. Reduce and thicken the sauce over low heat for about 5 minutes. Let cool for 5 minutes and drizzle over the apple spice cake and ice cream.

Sunday, February 22, 2009

Italian Beef Stew with Salsa Verde


In light of things being crazy lately, I haven't spent much time at all cooking or going out and buying expensive ingredients. I've been scared into sitting at home and having frugal salads and noodles... well almost. Last week we were in Portland and had our ritualistic brewpub tour, that sort of made my belly feel all icky and the feeling has lasted till now. So basically I'm feeling both very mentally strained (just from the news, work and life in general) and physically unfit (from too much beer!). Which is just as well, since Oregon might be raising their beer taxes to $0.15 a pint.

I decided tonight that we were going to have the farcical Academy Awards on in the background and cuddle with a good bowl of beef stew, embracing the last days of winter. I can't bloody wait for the dreariness to be over and usher in spring with some darn good asparagus! My predictions for tonight: Everything that everyone predicted will win will win. It's the Academy Awards, it's all about predictability, studio money and bad hairstyles.


This is a recipe I am very proud of, which I perfected off a general Italian beef stew recipe. It's one the best beef stews (in my opinion) that you will ever have and topped with Italian Salsa Verde - which differs from the more famous Mexican one in that it has no tomatillos or jalapenos - is a wonderful meal to have when the outside world is all troubled and all you want is to find a little comfort in the food you eat.

Italian Beef Stew
Serves 4

1 lb beef chuck or stewing beef, cut into 1 inch cubes
2 medium carrots, roughly chopped into 1 inch portions
3 ribs celery, roughly chopped into 1 inch portions
1 medium onion, roughly chopped
3 cloves garlic, minced
8 new potatoes, whole or 4 medium sized potatoes, quartered
1 can (14.5oz) organic, low-sodium diced tomatoes
4 cups low sodium beef stock
1/2 cup red wine
1/2 tsp dried oregano
1/2 tsp dried marjoram
1/2 tsp dried rosemary
1 tsp dried basil
1 tsp dried parsley
3 sprigs fresh thyme or 2 tsp dried thyme
2 tsp fresh ground black pepper
Salt to taste
Olive oil

Heat two tablespoons of olive oil in a dutch oven or stainless steel soup pot. Brown the beef evenly, about 4 minutes on each side.

Add in the onions, carrots and celery into pot and saute the aromatics until fragrant, about 7 minutes - the onions should be translucent.

Turn up the heat and add in the garlic and canned tomatoes. Stir for 2 -3 minutes and add in the beef stock, red wine and herbs. Bring to a boil, cover and simmer for an hour.

Add in the potatoes and simmer for an additional hour until the beef and potatoes are tender and the soup has thickened into a stew-like consistency. For a tastier stew, let the cooled stew sit overnight in the fridge. Reheat the stew the next day and serve over crusty bread and topped with a dollop of the salsa verde.


Italian Salsa
1 1/4 cups extra virgin olive oil
1/4 cup sherry vinegar
1/2 cup finely chopped fresh Italian parsley
2 cloves garlic, minced finely
1 medium shallot, minced finely
1 tablespoon capers, drained
1/2 tsp red chili flakes
Pinch of salt

Combine the parsley, garlic and shallots in a bowl. Add in the vinegar, capers, red chili flakes and salt and stir gently to combine. Drizzle in the olive oil and let salsa verde steep for 1/2 an hour at room temperature.

Friday, January 30, 2009

A Healthy Take on Ina Garten: Chunky Banana Bran Muffins


So ok. You should really know my workout schedule by now. I try to time my gym sessions with Giada and Ina and Chris Matthews to offset the boredom that is the elliptical or the pain that is the treadmill. For the uninitiated, that's the Food Network cooks: Giada de Laurentiis (tiny Italian, platform wearing, big-breasted hottie) and Ina Garten (big lady with a big gorgeous house) and Chris Matthews of MSNBC's Hardball (grouchy old bloke with a penchant for political sarcasm).

I like Giada mostly because she cooks easy and gorgeous food, doesn't have an annoying grin and because I lust after her pepper mill. I always come away from watching Giada's show with some recipe I keep in mind to make.

Now, the Barefoot Contessa on the other hand. I don't know. I'm quite torn. On one hand, I think she makes really elegant stuff, knows what she's talking about and isn't quite so pretentious like say... oh I don't know, Emeril Lagasse? She definitely isn't as annoying as Daisy Martinez or god forbid, Rachael Ray. On the hand, I find the Ina Garten's recipes so terribly unhealthy, I don't think it should be aired on national telly where half the population are already overweight. She can make even bran muffins unhealthy! It's quite astounding really, how she puts tons of buttermilk AND tons of butter to make bran muffins - something we all associate with being healthy. I don't know, sometimes I come off watching her show feeling a little cheated. Can you really NOT have good food without adding vats of oil and animal fat? The show today was something about breakfasts, I don't get how after having one of those insanely bad bran muffins, you can even think about eating bacon and potato omelettes! The Carbs! The Fat! Aaaahhhh... no wonder we're a nation of pure, unhealthy fatties.

So here's MY take on what a good banana bran muffin should be, one that won't leave you paunchy and sluggish from fat overkill and will still meet your fiber needs. You can have two of them with coffee for breakfast and will still be able to manage your calorie intake even if you are on a dismal, anorexic diet of 1200 calories a day! Serve with a teaspoon of raspberry jam, and you're still in the dismal, anorexic range.


Chunky Bran Muffin

Makes about 9 muffins, 135 calories each

3/4 cup whole wheat flour
1/2 cup unprocessed wheat bran
1/4 cup brown sugar
1/2 tsp baking soda
1/2 tsp baking powder
1 tbsp grounded flax seed
1 egg
1 large banana, sliced
1/4 cup applesauce
1/2 cup soy milk or low fat milk
1/2 cup honey
1 tsp grated orange zest
1/2 tsp vanilla extract
1/2 cup raisins
1/4 cup chopped walnuts

Preheat the oven to 400°F. Line a muffin tin with 9 paper liners.

Whisk egg in a medium bowl. Add in soy milk, applesauce, orange zest and vanilla extract.

Mix together dry ingredients in a large bowl. Make a well in the center and pour in the egg mixture. Mix until just combined. Add in nuts, banana, honey and raisins. Give it one or two stirs to combine.

Spoon into lined muffin tray until 3/4 full. Bake at 400°F for 15 - 20 minutes until a thin knife inserted in the middle of a muffin comes out clean. Cool on wire racks. If serving the next day, warm in an oven at 325°F for about 5 minutes.

Saturday, January 24, 2009

Chocolate Fix: Eggless Banana Bars


Now, don't get me wrong. I have absolutely nothing against vegans or the whole vegan agenda, I just like me some meat, lots and lots of cheese and more meat. Heck, my favourite meal is roast chicken with tons of beer! I also like calling vegan baking "eggless" instead of vegan - that's how much in denial I am about the positive side of veganism.

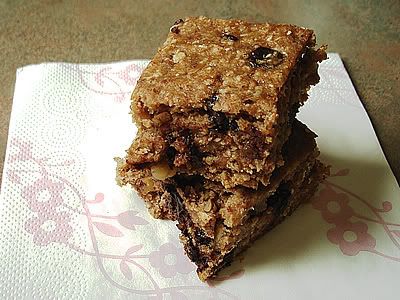
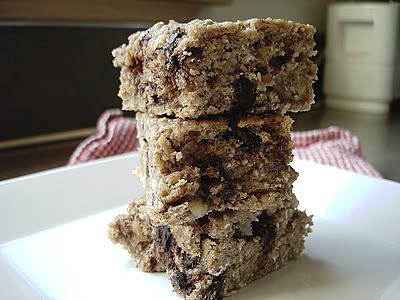
These "eggless" banana-walnut-chocolate chip bars are the best things I've had in a while, they actually taste like soft, moist banana brownies but without all the seemingly evilness of regular brownies. The recipe comes from a website called Cookie Madness (yikes!) and they have a TON of vegan baking recipes on there. These bars are really easy to make and would serve as energy bars or a healthy dessert with some vanilla ice-cream.

Eggless Banana Bars

Yields about 15 bars (2x3 inch bars)

2 large, ripe bananas (mashed)
2 tablespoons unsweetened applesauce
1 tablespoon ground flax
3 tablespoon hot water
2 tablespoons margarine or butter, melted and cooled slightly
1 tsp vanilla
3/4 cup whole wheat flour
3/4 cup old-fashioned oats
1/2 cup brown sugar
1/4 tsp baking soda
1/4 tsp ground cinnamon
1/2 tsp salt
1/2 cup dark chocolate chunks
1/4 cup chopped walnuts

Preheat the oven to 350°F.

Line a 8-inch square pan with aluminum foil and set aside.

Pulse the old-fashioned oats in a food processor until they look coarsely ground.

Mix the ground flax and hot water together and stir until a paste forms, this will be your binder. Set aside to cool.

In a large bowl, mix the flour, ground oats, sugar, salt, cinnamon and baking soda together.

In a separate medium bowl, mix together the mashed bananas, applesauce, ground flax mixture, melted butter and vanilla.

Make a well in the middle of the flour mixture and pour in banana mixture. Using a wooden spoon or a hard spatula, mix everything together until well combined. The mixture will be quite dry, make sure you mash the bananas well.

Add in the chocolate chunks and walnuts and stir to combine.

Spoon the batter into the prepared tin and bake at 350°F for 25 minutes. Cool in pan for 15 minutes, remove and cool completely on a wire rack.

Cut into 15 bars.

Thursday, January 22, 2009

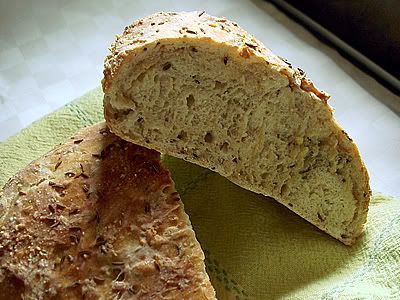
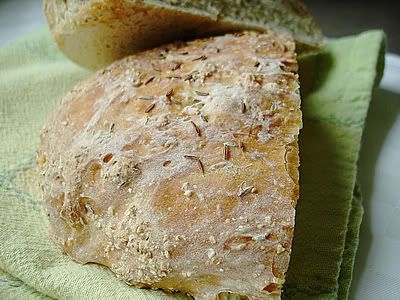
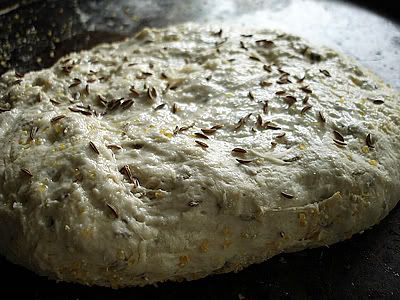
No-knead Rye Bread

Bread recipes tend to scare me - mostly because I've heard all sorts of nightmarish stories about loaves that are as hard as brick, a black hole in the middle of the dough, rubbery textures that put a dog's chew toy to shame etc., etc. Also, I've always that bread making should be left up to French pastry chefs and Boudoin.

I very recently, however, stumbled upon this really good site (always strange when a young man likes baking) that had a great rye bread recipe that apparently required no-kneading. I wasn't so sure if it would work, the picture looked mercilessly appealing, and I knew, I just knew that if I could make my own bread, I wouldn't have to make that dreaded Saturday trip to fight with the masses at Trader Joe's.

This bread recipe goes marvelous with an olive oil dip or just some plain ol' good quality butter. It also goes well with curry, soup, sandwiches or just to munch on something while you start preparing the next batch!

Deli-Style Rye Bread
Makes 2 1 lb loaves. From Artisan Bread in 5 Minutes a Day on Pete Bakes.

1 1/2 cups lukewarm water
2 1/4 tsp yeast
2 1/4 tsp salt
2 1/4 tsp caraway seeds, plus more for sprinkling
1/2 cup rye flour
2 1/4 cups all purpose flour
cornmeal for sprinkling
cornstarch for cornstarch wash

1. Mix the yeast, salt and caraway seeds with the water in a large bowl. Mix in the remaining dry ingredients without kneading. Ingredients will be sticky. Cover with a towel and allow to rest at room temperature for about 2 hours. at this point, you can prepare the dough for baking or store in the fridge for up to 2 weeks*.

2. Dust the surface of the dough with flour and cut off 1/2 of the dough (Note: the dough is sticky, so make sure you dust your hands properly with flour). Dust the piece with more flour and quickly shape it into a ball. Elongate the ball into an oval-shaped loaf. Allow it to rest and rise on a cornmeal covered surface (pizza peel if you’re going to transfer to a baking stone or a baking sheet if you’re baking right on the baking sheet) for 40 minutes.

3. Preheat the oven to 450 F with an empty broiler tray on the shelf underneath the one you plan to bake on. Heat the baking stone up with the oven if you are using one.

4. Make the cornstarch wash by combining 1/2 tsp cornstarch with a small amount of water to form a paste. Add 1/2 cup water, whisk and microwave for about 60 seconds. Paint the top of the loaf with the cornstarch wash and then sprinkle on caraway seeds. Slash with a deep parallel cuts across the loaf using a serrated bread knife*.

5. Bake the loaf on a baking sheet or slide it onto the hot baking stone. bake for 30 minutes. As you put the bread in the oven to bake, pour 1 cup of hot tap water into the broiler tray and quickly close the oven door. Allow to cool before slicing or eating.

*If you've refrigerated your dough, you might want to let it cool down to room temperature before shaping it into a loaf.
* I don't see the point of making the slashes, unless you want your break your bread easily into slices. This step may be omitted.

Monday, January 19, 2009

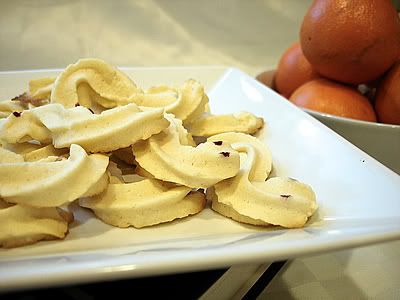
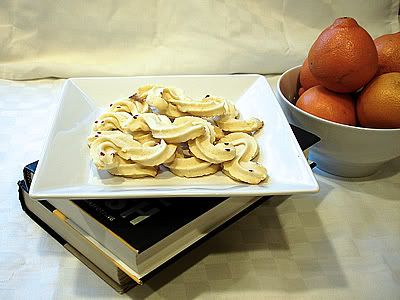
Dragon Cookies for Chinese New Year (Manda's Squirrgle Cookies)


Chinese New Year falls on January 26 this year (I think). I'm not sure what zodiac year it is though. The year of the Water Rat? The year of the Brazen Ox? Dunno! But what I do know is that it gives me an excuse to bake some cookies I've been yearning for a long time now.

Dragon cookies or "loong (dragon) peng (cookies)" are sort of the Chinese version of spritz cookies, the melt in your mouth milky kind that you make once a year because it has the calorie content of an entire year's worth of dinner. It's that kind of cookie.

I don't really know if dragon cookies are a predominantly Malaysian-Chinese thing, but by jove, the entire world should know how good these really are. Did I mention that it's milky and melts in your mouth (not in your hands!).

This recipe is from a friend of my mum's who makes cookies for a living. She makes the BEST dragon cookies and pineapple tarts, and my cookies only do half the justice. Some recipes I found online calls for 'cornflour' which is should not be confused with cornstarch, but I find that the combination of 'cornstarch' and all-purpose flour works just fine. Just make sure you use good butter at room temperature.

Dragon Cookies (Loong Peng)
Makes 35 cookies

1 1/4 cup all purpose flour
1/2 cup corn starch
2 tablespoon dried powdered milk
1 cup butter (about 2 sticks) - room temperature and soft
1 cup confectioner's sugar (icing sugar, powdered sugar)
2 egg yolks
1 egg white
1/2 teaspoon vanilla

Red food colouring (optional)
Pastry bag and star tip 22

Preheat oven to 350°F. Line two baking trays with parchment paper.

Sift flour, corn starch and milk powder in a medium bowl.

Make sure butter is at room temperature and very soft. Cream butter, sugar, eggs and vanilla together until smooth but do not over beat.

Gently fold in sifted flour mixture and beat until just combined.

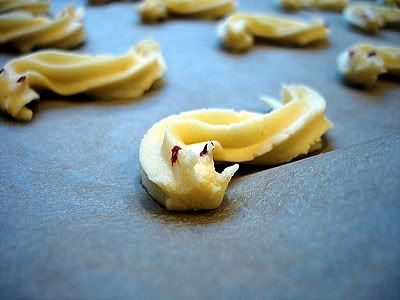
Spoon batter into pastry bag fitted with a star tip (Number 22) and squeeze batter out into short zigzags (I like to call them little "squirrgles", wheee!) on the prepared baking sheets.

Dab two "eyes" onto the dragons using some red food colouring and the sharp end of a skewer.

Bake for about 10 minutes at 350°F. Make sure that the cookies don't brown and are still slightly soft when you remove them from the oven. Leave to cool on wire racks.

The cookies should last up to two weeks in an air tight container.