Friday, January 30, 2009

A Healthy Take on Ina Garten: Chunky Banana Bran Muffins


So ok. You should really know my workout schedule by now. I try to time my gym sessions with Giada and Ina and Chris Matthews to offset the boredom that is the elliptical or the pain that is the treadmill. For the uninitiated, that's the Food Network cooks: Giada de Laurentiis (tiny Italian, platform wearing, big-breasted hottie) and Ina Garten (big lady with a big gorgeous house) and Chris Matthews of MSNBC's Hardball (grouchy old bloke with a penchant for political sarcasm).

I like Giada mostly because she cooks easy and gorgeous food, doesn't have an annoying grin and because I lust after her pepper mill. I always come away from watching Giada's show with some recipe I keep in mind to make.

Now, the Barefoot Contessa on the other hand. I don't know. I'm quite torn. On one hand, I think she makes really elegant stuff, knows what she's talking about and isn't quite so pretentious like say... oh I don't know, Emeril Lagasse? She definitely isn't as annoying as Daisy Martinez or god forbid, Rachael Ray. On the hand, I find the Ina Garten's recipes so terribly unhealthy, I don't think it should be aired on national telly where half the population are already overweight. She can make even bran muffins unhealthy! It's quite astounding really, how she puts tons of buttermilk AND tons of butter to make bran muffins - something we all associate with being healthy. I don't know, sometimes I come off watching her show feeling a little cheated. Can you really NOT have good food without adding vats of oil and animal fat? The show today was something about breakfasts, I don't get how after having one of those insanely bad bran muffins, you can even think about eating bacon and potato omelettes! The Carbs! The Fat! Aaaahhhh... no wonder we're a nation of pure, unhealthy fatties.

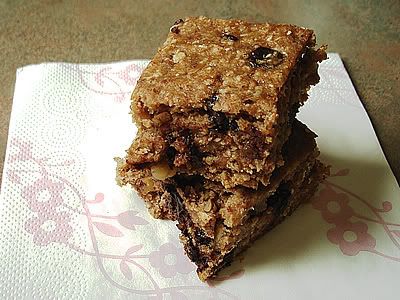
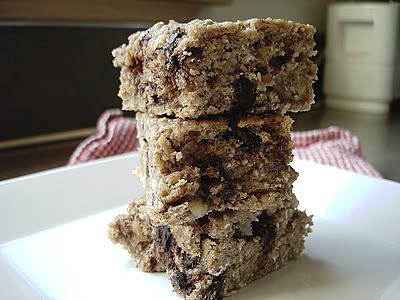
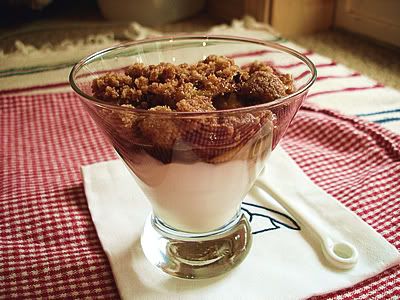
So here's MY take on what a good banana bran muffin should be, one that won't leave you paunchy and sluggish from fat overkill and will still meet your fiber needs. You can have two of them with coffee for breakfast and will still be able to manage your calorie intake even if you are on a dismal, anorexic diet of 1200 calories a day! Serve with a teaspoon of raspberry jam, and you're still in the dismal, anorexic range.


Chunky Bran Muffin

Makes about 9 muffins, 135 calories each

3/4 cup whole wheat flour
1/2 cup unprocessed wheat bran
1/4 cup brown sugar
1/2 tsp baking soda
1/2 tsp baking powder
1 tbsp grounded flax seed
1 egg
1 large banana, sliced
1/4 cup applesauce
1/2 cup soy milk or low fat milk
1/2 cup honey
1 tsp grated orange zest
1/2 tsp vanilla extract
1/2 cup raisins
1/4 cup chopped walnuts

Preheat the oven to 400°F. Line a muffin tin with 9 paper liners.

Whisk egg in a medium bowl. Add in soy milk, applesauce, orange zest and vanilla extract.

Mix together dry ingredients in a large bowl. Make a well in the center and pour in the egg mixture. Mix until just combined. Add in nuts, banana, honey and raisins. Give it one or two stirs to combine.

Spoon into lined muffin tray until 3/4 full. Bake at 400°F for 15 - 20 minutes until a thin knife inserted in the middle of a muffin comes out clean. Cool on wire racks. If serving the next day, warm in an oven at 325°F for about 5 minutes.

Saturday, January 24, 2009

Chocolate Fix: Eggless Banana Bars


Now, don't get me wrong. I have absolutely nothing against vegans or the whole vegan agenda, I just like me some meat, lots and lots of cheese and more meat. Heck, my favourite meal is roast chicken with tons of beer! I also like calling vegan baking "eggless" instead of vegan - that's how much in denial I am about the positive side of veganism.

These "eggless" banana-walnut-chocolate chip bars are the best things I've had in a while, they actually taste like soft, moist banana brownies but without all the seemingly evilness of regular brownies. The recipe comes from a website called Cookie Madness (yikes!) and they have a TON of vegan baking recipes on there. These bars are really easy to make and would serve as energy bars or a healthy dessert with some vanilla ice-cream.

Eggless Banana Bars

Yields about 15 bars (2x3 inch bars)

2 large, ripe bananas (mashed)
2 tablespoons unsweetened applesauce
1 tablespoon ground flax
3 tablespoon hot water
2 tablespoons margarine or butter, melted and cooled slightly
1 tsp vanilla
3/4 cup whole wheat flour
3/4 cup old-fashioned oats
1/2 cup brown sugar
1/4 tsp baking soda
1/4 tsp ground cinnamon
1/2 tsp salt
1/2 cup dark chocolate chunks
1/4 cup chopped walnuts

Preheat the oven to 350°F.

Line a 8-inch square pan with aluminum foil and set aside.

Pulse the old-fashioned oats in a food processor until they look coarsely ground.

Mix the ground flax and hot water together and stir until a paste forms, this will be your binder. Set aside to cool.

In a large bowl, mix the flour, ground oats, sugar, salt, cinnamon and baking soda together.

In a separate medium bowl, mix together the mashed bananas, applesauce, ground flax mixture, melted butter and vanilla.

Make a well in the middle of the flour mixture and pour in banana mixture. Using a wooden spoon or a hard spatula, mix everything together until well combined. The mixture will be quite dry, make sure you mash the bananas well.

Add in the chocolate chunks and walnuts and stir to combine.

Spoon the batter into the prepared tin and bake at 350°F for 25 minutes. Cool in pan for 15 minutes, remove and cool completely on a wire rack.

Cut into 15 bars.

Thursday, January 22, 2009

No-knead Rye Bread

Bread recipes tend to scare me - mostly because I've heard all sorts of nightmarish stories about loaves that are as hard as brick, a black hole in the middle of the dough, rubbery textures that put a dog's chew toy to shame etc., etc. Also, I've always that bread making should be left up to French pastry chefs and Boudoin.

I very recently, however, stumbled upon this really good site (always strange when a young man likes baking) that had a great rye bread recipe that apparently required no-kneading. I wasn't so sure if it would work, the picture looked mercilessly appealing, and I knew, I just knew that if I could make my own bread, I wouldn't have to make that dreaded Saturday trip to fight with the masses at Trader Joe's.

This bread recipe goes marvelous with an olive oil dip or just some plain ol' good quality butter. It also goes well with curry, soup, sandwiches or just to munch on something while you start preparing the next batch!

Deli-Style Rye Bread
Makes 2 1 lb loaves. From Artisan Bread in 5 Minutes a Day on Pete Bakes.

1 1/2 cups lukewarm water
2 1/4 tsp yeast
2 1/4 tsp salt
2 1/4 tsp caraway seeds, plus more for sprinkling
1/2 cup rye flour
2 1/4 cups all purpose flour
cornmeal for sprinkling
cornstarch for cornstarch wash

1. Mix the yeast, salt and caraway seeds with the water in a large bowl. Mix in the remaining dry ingredients without kneading. Ingredients will be sticky. Cover with a towel and allow to rest at room temperature for about 2 hours. at this point, you can prepare the dough for baking or store in the fridge for up to 2 weeks*.

2. Dust the surface of the dough with flour and cut off 1/2 of the dough (Note: the dough is sticky, so make sure you dust your hands properly with flour). Dust the piece with more flour and quickly shape it into a ball. Elongate the ball into an oval-shaped loaf. Allow it to rest and rise on a cornmeal covered surface (pizza peel if you’re going to transfer to a baking stone or a baking sheet if you’re baking right on the baking sheet) for 40 minutes.

3. Preheat the oven to 450 F with an empty broiler tray on the shelf underneath the one you plan to bake on. Heat the baking stone up with the oven if you are using one.

4. Make the cornstarch wash by combining 1/2 tsp cornstarch with a small amount of water to form a paste. Add 1/2 cup water, whisk and microwave for about 60 seconds. Paint the top of the loaf with the cornstarch wash and then sprinkle on caraway seeds. Slash with a deep parallel cuts across the loaf using a serrated bread knife*.

5. Bake the loaf on a baking sheet or slide it onto the hot baking stone. bake for 30 minutes. As you put the bread in the oven to bake, pour 1 cup of hot tap water into the broiler tray and quickly close the oven door. Allow to cool before slicing or eating.

*If you've refrigerated your dough, you might want to let it cool down to room temperature before shaping it into a loaf.
* I don't see the point of making the slashes, unless you want your break your bread easily into slices. This step may be omitted.

Monday, January 19, 2009

Dragon Cookies for Chinese New Year (Manda's Squirrgle Cookies)


Chinese New Year falls on January 26 this year (I think). I'm not sure what zodiac year it is though. The year of the Water Rat? The year of the Brazen Ox? Dunno! But what I do know is that it gives me an excuse to bake some cookies I've been yearning for a long time now.

Dragon cookies or "loong (dragon) peng (cookies)" are sort of the Chinese version of spritz cookies, the melt in your mouth milky kind that you make once a year because it has the calorie content of an entire year's worth of dinner. It's that kind of cookie.

I don't really know if dragon cookies are a predominantly Malaysian-Chinese thing, but by jove, the entire world should know how good these really are. Did I mention that it's milky and melts in your mouth (not in your hands!).

This recipe is from a friend of my mum's who makes cookies for a living. She makes the BEST dragon cookies and pineapple tarts, and my cookies only do half the justice. Some recipes I found online calls for 'cornflour' which is should not be confused with cornstarch, but I find that the combination of 'cornstarch' and all-purpose flour works just fine. Just make sure you use good butter at room temperature.

Dragon Cookies (Loong Peng)
Makes 35 cookies

1 1/4 cup all purpose flour
1/2 cup corn starch
2 tablespoon dried powdered milk
1 cup butter (about 2 sticks) - room temperature and soft
1 cup confectioner's sugar (icing sugar, powdered sugar)
2 egg yolks
1 egg white
1/2 teaspoon vanilla

Red food colouring (optional)
Pastry bag and star tip 22

Preheat oven to 350°F. Line two baking trays with parchment paper.

Sift flour, corn starch and milk powder in a medium bowl.

Make sure butter is at room temperature and very soft. Cream butter, sugar, eggs and vanilla together until smooth but do not over beat.

Gently fold in sifted flour mixture and beat until just combined.

Spoon batter into pastry bag fitted with a star tip (Number 22) and squeeze batter out into short zigzags (I like to call them little "squirrgles", wheee!) on the prepared baking sheets.

Dab two "eyes" onto the dragons using some red food colouring and the sharp end of a skewer.

Bake for about 10 minutes at 350°F. Make sure that the cookies don't brown and are still slightly soft when you remove them from the oven. Leave to cool on wire racks.

The cookies should last up to two weeks in an air tight container.

Thursday, January 15, 2009

Chicken in Cheap Wine: Coq Au Vin


Ever since I received a dutch (French, pardon) oven for Christmas, I've been wanting to make as many stews as I can, just so it gives me an excuse to use my beloved Staub. It is after all called a cocotte and what else better to make in it than a traditional French dish.


I was hunting high and low just the other day for a bottle of burgundy. Alton Brown suggests a good bottle of pinot noir while Nigel Slater says a beaujolais will do just fine. Seeing as this is my first time making coq au vin, I wanted to keep the cost below $20 for the whole meal. That meant putting aside the $25 of Willamette Valley 2006 Pinot Noir and using a relatively cheapo bottle of wine.


"Blasphemous!", the gourmet cook pooh-poohs. Well, guess what you rotten snooty connoiseur of fine foods. I went out and got THE CHEAPEST JUG of burgundy you will ever find in this lifetime. I settled for a bottle of Carlo Rossi Burgundy that is made from an undefined grape varietal and was aged in Tupperware cases down in Grandma Rossi's basement. The chicken I think, turned out surprisingly marvelous. I would however, not recommend drinking the wine. You would probably want to just feed it to the drain pipes and pull out that bottle of expensive pinot. You know what they say about "never cook with wine you won't drink?", well PISH TO THAT.

By the way, I've modified the recipe to suit regular tender, free range chicken bought in the comfort of your pretentious co-op. Unless you have a shotgun in hand and a taste for wild fowl, it won't take you hours to make this recipe.


Coq Au Vin

Adapted from Alton Brown and Nigel Slater
Serves 4

6 chicken drumsticks
4 chicken thighs
15 red pearl onions
1 medium onion, roughly chopped
1 stalk celery, roughly chopped
2 medium carrots
5 slices uncured bacon
10 oz brown mushrooms, sliced (about 1 cup)
8 sprigs fresh thyme
2 bay leaves
1 cup low-sodium chicken broth
6 cups red wine (pinot noir or beaujolais)
3 cloves garlic, smashed
Salt and Pepper

Cut off the ends of the pearl onions. Bring a saucepan of water to boil and add in the onions. Boil the onions for one minute and remove from the water. Leave to cool. When the onions have cooled, peel off the outer skin and set aside.

Season the chicken with a little salt and pepper and set aside.

Preheat the oven to 325°F.

Add the chopped carrot, celery, thyme, bay leaves, onion and garlic into a 5 -6 quart dutch oven.

In a large saute pan, add one tablespoon of water and the bacon. Fry the bacon until all the water has evaporated and the bacon is golden in colour, about 10 minutes. Using a slotted spoon, remove the bacon, leaving the lard in the pan.

In the same saute pan, fry the pearl onions whole until brown, about 8 - 10 minutes. Sprinkle a little salt over the onions. Remove onions and set aside with the bacon. Again, in the same pan, fry the chicken pieces until golden brown, about 8 minutes. Place the fried chicken into the dutch oven.

In the same saute pan, fry the mushrooms for about 8 minutes until the mushrooms are browned and the juices are evaporated. Set the mushroom aside with the onions and bacon.

Deglaze the saute pan with one cup of wine. Pour the wine into the chicken in the dutch oven. Add in the remaining wine and chicken stock into the dutch oven.

Braise the chicken in the oven at 325°F for 1 hour and 45 minutes.

After braising, remove the chicken, vegetables and all the herbs from the stock in the dutch oven and set aside. Discard the herbs.

Bring the stock in the dutch oven to a boil until it reduced by half, this should take about 10 - 15 minutes. Add in the onions, bacon and mushroom and allow it to heat through for about 5 minutes. Add in the chicken and vegetables and simmer for another 5 minutes. Season to taste with salt and pepper.

Turn heat off and serve with bread, egg noodles or potatoes and a side of salad with balsamic vinaigrette.

*Note: Alton Brown marinades the chicken in the wine stock overnight. This works if you're using a really old bird or rooster and the meat needs to be braised for a long time. I find that a waste of time if you're using regular chicken; it makes the wine flavour overwhelming and the chicken meat too soft. Braising or over and hour would suffice to infuse the chicken with a subtle wine flavouring and leave the chicken on the bone.
*Note: Because the bacon is already slightly salty, watch it when seasoning with salt.

Sunday, January 11, 2009

Char Kway Teow


On some days, the Malaysian side of me kicks in and I find myself craving some hawker-style food that involves lots of oil, pork lard and piping-hot stir-fries. As much as I think the Malay Satay Hut is a saving grace to all the forlorn Malaysians in Washington, I sometimes don't think paying $10 for a plate of noodles is justified.

Char kway teow is basically just fried rice noodles, Malaysian style. The three main ingredients in any good char kway teow are chinese sausages, prawns and especially fresh bean sprouts. It's super easy to make, provided you're not afraid to use the highest heat setting on your stove, and make sure everything is prepared beforehand so that you can chuck things in to the wok at rapid-fire speed.


My mum's trick to bringing out the flavour of any fried noodle dish is to add a little pork lard, so I'm using this method here. You can omit this and just add vegetable oil, but I guarantee you won't regret trying out what a little piece of bacon can do!

Char Kway Teow
Serves 4

12 oz. flat rice noodles (fresh or dried)
2 slices bacon or pork belly
2 cloves garlic, minced
1 link chinese sausage, sliced thinly on the diagonal
20 medium-sized fresh shrimp (31-40 ct)
4 cups bean sprouts
3 stalks scallions
1 tsp chili paste (sambal olek) or 2 tsps if you like it spicier
1/2 tsp salt

Sauce
2 tbsp light soy sauce
4 tbsp dark soy sauce
4 tbsp sweet soy sauce
1 tbsp fish sauce
2 tbsp water
1 tbsp vegetable oil
1 tsp white pepper

If using dried noodles, soak in boiling water for 10 minutes. Bring entire pot of noodles to a boil for 1 minute. Turn off the heat and leave the noodles in the pot until al dente. Drain and rinse well with cold water.

Heat a wok or cast iron skillet on medium heat. Fry the bacon until crispy and the lard starts to melt in the pan.

At this point, you want to do everything in rapid succession.

Turn the heat up to high. Add in the chinese sausages. Fry for 1 minute until fragrant. Add in the garlic, prawns and salt. Fry for about 2 minutes until the prawns are no longer pink.

Add in the noodles, chili paste and sauce mixture. Fry for 3 minutes, stirring constantly. Push the noodles aside and break in the eggs at the empty side of the wok. Quickly scramble the eggs and combine it with noodles. Mix everything together and fry for another 3 minutes until the noodles are slightly charred.

Add in the bean sprouts and scallions. Turn the heat off. Give the noodles a quick stir, flip to combine all ingredients and serve immediately.

Sunday, January 4, 2009

The 'I Love Sunday' Post


Aaaah, Sundays... I always wake up feeling nice and contented with warm, toasty toes (but then I go to bed on Sunday night all depressed because it will be Monday when I open my eyes, bleurgh). I wake up to a tremendous-sized breakfast while I read the paper, followed by a nice long walk with the dog. Then, late in the afternoon, in this dreary, north-facing apartment of mine, I snuggle under the blankets with a good book and a glass of wine whilst listening to the latest (illegal) music downloads in the background, over the din of dripping rain. Aaaah, Sundays.


I spent all of last night dreaming about a crème fraîche recipe I saw on Tartelette. My weak spots are, in no particular order, tomatoes, parmesan, Daniel Kessler of Interpol, coffee, beer and crème fraîche. Helen on Tartelette has such amazing photos that I'm almost magically transported back to holidays in Paris where I grew chubby on baguettes, cheese and all sorts of pretty pastries.


I made her banana tatin verrines recipe this morning, but instead of using a full amount of crème fraîche, I used half greek yogurt and half crème fraîche just so I can feel less guilty about indulging.


I'm posting the recipe to serve one person, since I am spending Sunday alone today, but make sure you head over to Tartelette for the original recipe and more glorious dessert drama.

Banana Tatin Verrines
From Tartelette

2 tablespoons greek yogurt
2 tablespoons crème fraîche
1 tablespoons water
1 tablespoons butter
1 bananas, cut into thick slices
Crumble topping (recipe follows)

Spoon the yogurt and crème fraîche into a glass.

In a large skillet set over medium high heat, cook the sugar with the water until it caramelizes to a golden caramel. Turn the heat down to medium and add the butter. Let it melt before adding the bananas. Let them cook in the caramel for a couple of minutes until soft and caramelized. Remove from the heat and wait a couple of minutes before spooning the banana mixture over the yogurt mix. Top with the crumble and serve.


For the crumble topping:
2 tablespoons cup light brown sugar
2 tablespoons all purpose flour
1 tablespoons cold butter
1 tablespoons chopped crystallized ginger

Preheat your oven to 350F.
In a bowl, combine the sugar, flour. Add the butter cut in small pieces, the ginger and mix with your fingertips until you get a mixture that ressembles coarse crumbs. Spread the mixture on a parchment lined baking sheet and bake for 15 minutes until golden brown. Let cool to room temperature.

Friday, January 2, 2009

Looking for a new camera?

This is for all you foodies who like pretty pictures:

I've been dying to get a Nikon D60 for ages - I think it's one of the best cameras out there for the price. I spend almost everyday diligently scouring the web for the best deal and... I found a superbly amazing deal on Costco.com (Of course!). The deal beats ANYTHING I've seen in a long time.

Note: In parentheses is the price of the item found on Amazon

It includes the camera body and of course the default 18-35mm VR lens ($519.98), but this deal on Costco also comes with:

55-200mm zoom Nikkor Lens ($189.50)
1GB SD card ($25)
A carry bag ($44.98)

The Costco price is basically the same except they give you $150 off and when you add it to the cart, they take another $50 off - so the whole damn thing is... $649.99.

Go score yourself one. If you're not a Costco member, you should beg/borrow/steal to get one.